 Meticulous surface preparation is the key to an outstanding paint job. Although I am first and foremost a house painter I have acquired skills in a variety of support trades, crack-filling is one of these trades.
I begin the process of painting a room with a light sanding of the walls. This removes any imperfections such as globs of paint left from a previous paint job. While hand sanding the walls I keep a close eye out for any areas that may require repairs. Problems such as cracked corner joints, nail pops and nail holes are identified for repair. To repair these areas I use a crack-filling compound formulated by CGC to reduce airborne dust. Hand sanding a sanding sponge allows me to feather the repaired areas to the level of the surround wall or ceiling. This process makes the repair almost invisible.
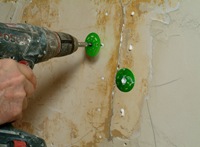
 Often plaster walls, a feature of old homes, require more extensive attention prior to painting. Over time the « keys » that hold the plaster surface to the underlying lath can break away causing large sections to become loose. In order to re-attach these areas I drill a series of small holes with a masonry bit in order to make contact with the underlying lath. These holes are then injected with adhesive to lock the section back in place. The area is temporarily secured with anchor washers and drywall screws until the adhesive sets. The temporary anchors are then removed and the holes filled with a mixture of lime putty and gauging plaster. Saving a heavily cracked plaster wall is often a better option than complete removal and replacement with drywall. There is very little dust and mess generated by the repair process.
No photos available right now.
Please verify your settings, clear your RSS cache on the Slickr Flickr Admin page and check your Flickr feed
The type of repair work discussed above forms an essential part of my process. Without careful attention details like these, the completed paint work will not look « professional »